Violets are the favorite blooming houseplant and the easiest to grow and care for. They bloom carelessly all year when given regular feedings and good bright light.
LIGHT
Violets must have 10-12 hours of bright light per day (no direct sun). They also must have 8 hours of total darkness per day. Be sensitive to how your violets respond as some require brighter light than others.
Light is an important factor that determines whether your violets will bloom and keep their blooms. If they just won't bloom, the light is probably too dim for too much of the day or there is not sufficient period of total darkness. When the light is not bright enough for 10-12 hours each day, the violets can not produce flowers.
Window light will not produce plants that are symmetrical and full of blooms as fluorescent grow lights because these lights provide near perfect light for longer periods of time each day than even the best window.
Usually if your plants are across the room from a window the light will not be bright enough to cause blooming. To determine whether or not the plant is getting sufficient light, simply observe the leaves and the stems of the plant and discussed below. Direct sunlight is not necessary.
Windows facing north or east have the most favorable light conditions, but be sure to keep your African violets away from drafty windows. In the winter, a south or west window offers the best light.
Insufficient light:
To little light is probably the most common reason for failure of African violets to flower. Under these conditions, the leaves become darker green and thin, petioles or leaf stems are very long and weak, and the plants flower very little if at all. The stems will also be long and reaching upwards for the light.
Excessive light:
If too much light is present, the stems will be short and the leaves will grow down around the pot. Violets exposed to too much sunlight will have pale yellow-green leaves. When exposed to too much light, bleached-out, burned or dead areas also may be present.
Artificial Light:
African violets can be easily grown using artificial light. Fluorescent grow lights provide near perfect light for longer periods of time each day and yield more symmetrical blooming violets than those that rely on Window light. It is simply harder to keep the violets in constant bloom when only natural light is used.
Intensities of 1,000 foot-candles of light for 10-12 hours per day give good results. This compares to the light intensity of a sunny, east or west window or a bank of four fluorescent shop lights. Violets also will tolerate low light levels (200 to 500 foot-candles).
Fluorescent light should be positioned 10-12" above the top of the violets and left on for 10-12 hours per 24 hour period. Plants need at least 8 hours of darkness each day. Inexpensive timers are available in all hardware stores or on our site to automatically turn lights on and off.
Fluorescent lights are most frequently used and can be arranged in tiers or attached to shelves for a convenient and attractive light source.
I have found best a combination of one daylight bulb and one grow light or two daylight bulbs.
FERTILIZER
Most any fertilizer can be used that contains the right combination. I use Bloom Buster 20-50-20. You need to be looking for the middle number to be higher as it represents the Phosphorus which is critical for root development and blooms.
African Violets will respond best when you feed them small amounts of plant food at each watering. This constant feed method eliminates the need to watch the calendar for the fertilize date. I normally use fertilizer with each watering rather than on a schedule. I have found this works well and helps prevent those senior moments.
Review the directions on the container for making up the solution. I make up approximately 1/10 the concentration, even though most fertilizer directs for a stronger solution. If it indicates 1 teaspoon per gallon, use 1 teaspoon per gallon.
Whatever brand of plant food you use it can be used as a constant. NEVER allow the plant to become completely dry. Violets like to be "just moist", not wet.
SOIL
African Violet soil, purchased most anywhere. It is important the soil be a light and airy mix that is not packed hard. The soil must be porous to allow surplus water to pass through readily. A good growing medium should contain 50 percent matter, 25 percent air, and 25 percent water.
I use African Violet soil or loamy top soil and amend with perlite or vermiculite, and on occasion one part sand. It is important to prevent water logging with the use of aerated soil.
- 2 parts violet soil or loamy top soil
- 2 parts Vermiculite
or
1 part perlite
1 part sand
MAINTENANCE of you plants
REPOTTING
Cleaning of old pots: When reusing pots, wash them thoroughly and then soak them for 30 minutes in a solution of 1 part household chlorine bleach in 9 parts water. Rinse the pots until all traces of chlorine are gone.
It is important to repot at least twice a year. To do this, simply remove the root ball. Replace dirt in the bottom of the pot with a little fresh soil. Replace the root ball and as you hold in upright position, carefully sprinkle new soil around the sides and on top, just under the leaves.
Placement of plant: When potting African violets, take care to set the plant so that the crown in just above the surface and the soil is firmly pressed around it. Note: Emphasis should be on good soil drainage because free water on the surface may cause decay at the crown or at the bases of the leaf stalks.
GROOMING
Normally I remove old blossoms and the old bloom stock as the blooms become spent. When a leaf begins to look wilted, normally at the bottom row of the plant, I remove the leaf. I keep an extra leaf around my violet shelves and when dirt or dust is on the plant, I turn the leaf over and use as a wipe to brush dirt or dust away.
As an alternate, you can use a soft brush. Supporting the leaf from the underside with your fingertip, gently touch the brush bristles across the leave to remove debris.
To best clean the foliage on a violet, gently spray the leaves with a mixture of 1/2 teaspoon of white vinegar and 5 drops any brand hand wash dish detergent in 1 cup very warm water. Pat dry with a folded paper towel or use a grooming brush.
WATER
Watering your violet can be the most critical step in it's care. Over-watering is the most common reason for failure with violets. Once the excessive watering occurs, they die within a short time as the leaves wilt and become limp. If you violets die, it is probably because of too much water. Not watering enough or being erratic will cause slow growing violets. There are a few do's and don't.
"Don't GO There"
- Don't water from above
- Don't water without first touching the soil with your finger
- Don't water with cold water straight from the tap.
"Good Tricks"
- Once you have finished watering your plants, fill up the watering can and let it sit (for a few days until you are ready to water again). This allows the water to be at room temperature and ready to go.
- Every few days stick your finger in the soil of each plant. If the soil sticks to your finger and feels damp, the plant is OK. IF the soil crumbles away easily and doesn't feel damp, it is time to water again.
Moisture meters and devices are available which measure soil moisture. While some of these are fairly reliable, an easier method is to simply touch the soil surface with your fingertips. Allow the soil to become slightly dry between each watering, but don't allow it to become excessively dry as wilting can cause root damage.
Watering Can: Always us a watering can with a small spout. Two recommended methods:
a) If your pot is sitting in a nice deep saucer, fill up the saucer until the water is well above the bottom of the pot.
b) Let it sit for about an hour.
c) After an hour, if there is still water above the level of the bottom of the pot, take the pot out of the saucer, pour the water out of the saucer, and return the pot to the saucer.
Note: If you normally water from the bottom, is best to occasionally water from the top to assist in removal of accumulating salts.
a) Find a big deep tray or rectangular roasting pan.
b) Put your violet plants in the tray.
c) Let the plants sit in the tray for an hour.
d) Remove and return to their normal place.
 Individual plant, watering from the BOTTOM:
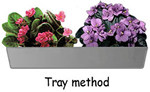 Big tray method:
- Watering from the TOP (least favorite for routine use):
Watering you violet from the top of the pot often leads to problems as water can spread and drops of water on the leaves cause disfiguring light-colored sport or rings. If you must, only apply water until it drains out the bottom of the pot. Pour off the excess after 20 to 30 minutes.
- Water wicking (My preference):
Wick watering is a growing method that provides plants with proper water, fertilizer, and humidity.
A nylon wick is placed on the bottom of the pot with the loose end extending out of the pot about 1/2 - 1 inch. I have found strips from nylon panty hoses work best.
The pot should never be placed into the fertilizer/water mixture; only the wick should touch the water. This type of wick will keep the violet watered for 2-4 weeks depending on the size of the reservoir.
Wick watering provides the plants with proper water, fertilizer, and humidity. If you currently top or bottom water, I suggest you convert one or two over at a time. Once you have the pattern down and your violets are doing well, the next time you repot, convert another group.
There are different ways to provide wick watering, depending on how many violets you have and your area. A single reservoir unit can be put together or a tray unit.
Single reservoir unit:
- This can be a simple margarine container with a hole cut in the lid that allows the wick to extend into the water. The length the wick for this type of container may need to be longer to ensure it reaches into the bottom of the container. Dissolve food in the water which allow for watering and feeding the same time (remember to make up the food/fertilizer and use of the concentrations the container states, dissolved into the volume of water as stated, i.e., if it says 1 teaspoon per quart, use 1 teaspoon per quart. Use this reconstituted dilute solution to fill your margarine container. )
Rest period: Once your container has emptied, do not refill immediately. It is good to let the violet sit on the empty container for 3 - 4 days to allow the soil to dry.
I suggest marking your calendar or placing a small stake in the soil to flag a reminder. I use color post-it flags on a toothpick or applicator stick to alert me. I place the day I am to refill the reservoir on the flag. Whatever fits to remind you to refill, use.
Remember, for wick watering to be successful you must use a soil mixture that is a mix of peat moss, perlite, and vermiculite. Ordinary violet soil is too heavy for wick watering. Wicks will normally bring the water up to thoroughly wet the bottom " of soil.
WICKING
The wicking cord we sell comes in two sizes: thin and heavy. The thin wick is suitable for any size pot simply by increasing the number of pieces used according to the size of the pot. To determine how many pieces of the thin wick to use with a pot measure the mouth of the pot (round down fractions). Subtract 1 from that number. That is how many pieces of thin wick to use. For example, for a 3" pot use 2 pieces of wick. For a 3 1/2" pot, also use 2 pieces.
After 6 - 8 months wicks can get clogged with minerals in the water, fertilizer residue, and soil particles and may need replacing.
LEACHING SALTS FROM SOIL
Observe your plants. If the top of the foil appears white or powdery, it is time to leach the soil.
Leaching out the built up salts:
Every 6 or 8 weeks when the soil is nearing dryness (and the reservoir is dry) top water the violet with warm water until it drains out of the holes in the bottom of the pot. I take mine to a sink or larger tub for ease. Let the violet continue to sit over the dry reservoir until the sold begins to dry out again and then resume water wicking. This type of flush helps the plant get rid of the fertilizer salts that have built up as it leaches the salts out.
I record on my calendar or move to a separate area of my plant tables/shelves when I am working with a group. A different post-it flag also serves as a reminder of those that holding for light drying following this procedure.
AIR, TEMPERATURE and HUMIDITY
Air, Temperature and Humidity:
Violets like relatively high humidity, but the air must be fresh and kept moving gently. They do not like drafts, specifically exposed to opening of outside doors during the colder months. Violets must always be protected from cold air even if only outside for a few minutes.
Temperatures:
The most attractive violets are grown at a nighttime temperature of 65゚ to 70゚ F and a daytime temperature of 70゚ to 90゚ F. Plants grown at temperature below 60 ゚ F will be deformed with leaves that curl down, cup and become brittle. Flowers may be deformed or discolored. An indicator your plants are exposed to cooler temperatures that are affecting growth, observe for changes in your leaf color to a lighter shade of green. In hot weather (over 85 degrees ゚F), plants are especially susceptible to rot.
During transport, they need to be wrapped or covered. Violets are tropical plants and should not be taken outside if the weather is below 60 degrees F.
Humidity:
Plants in high light and low humidity require more frequent watering than those in low light and high humidity. A coarse, well-drained soil mixture requires more frequent watering than a heavy, poorly drained soil mixture.
REPOTTING
Repotting African Violets:
Plants should be repotted each year using new planting medium and sterilized pots.
Repot violets about once a year, or when the leafless portion of the stem is about 1 to 1 1/2 inches long.
- Gently remove the plant from the pot with a paring knife (or spatula).
- Once the roots are almost dry, gently work your fingers in amongst the toots to crumble off most of the soil from the root system.
- Remove all lateral crowns, leaving only the center crown.
- Trim off one or two rows of leaves, leaving a wheel of leaves around the crown.
- Notice the portion of the main stem from which neither roots or leaves are growing. With the paring or light utility knife, carefully scrape the neck as you would a carrot until all of the brown plant material callous is removed and the neck is firm and green. The callous must be removed so that the stem can grow new roots once you bury it under the soil.
- Break or cut off the bottom half of the root.
- Have a clean pot ready to pot up the pruned violet. Gently firm in new soil around the plant and water well. The pot should be only 1/3 the diameter of the plant; a 4-inch pot is usually adequate.
Common errors:
- Full grown plants are not repotted often enough, and
- Plants are repotted into pots much too large for them.
Rule of Thumb: Leave starter plants in the pot they come in until its diameter (leaf span) reaches approximately 9", then pot it into a 3" pot. Grow in the 3" pot until it has grown approximately 12" across, and then move it into a 4" pot. If using wick watering, replace the wick with each repot.
Joe's rule of thumb: Measure the diameter of the plant and divide that measurement by 3. This is the pot size.
REMOVAL OF SUCKERS
A sucker is the beginning of a new plant which forms near the base of the main plant or in the axils (which is where the leaf stems join the central core of the violet). It is important to monitor your violets and not allow these to remain part of the violet.
Your violets will grow more symmetrically and bloom move heavily if you allow only one rosette of leaves to grow on one root system. Keep all suckers (side shoots) groomed off of your plants (unless they are trailing types).
Remove suckers with a pencil point, nut pick, small knife, or tweezers. I use a dental probe to slip them off. If the suckers are not removed you will eventually have a violet with 2 or 3 or more plants all crowded together in the pot.
Splitting of multiple plants:
If you have such a violet with 2 or 3 or more plants in one pot it is best to separate them. Slide the plant out of its pot and gently crumble away the soil. Pull the plants apart from each other with a gentle downward motion. Sometimes the plants must be cut apart. Keep the roots attached to those plants that have a root system.
Any that show signs of wilting may need tenting in plastic for a week (or perhaps as long as a month if they have no roots at all).
TYPES OF POTS
African violet pot: A regular flower pot is too deep. Either plastic or clay is fine. Just make sure it has at least one drainage hole in the bottom of it.
The type of pot you use has an effect on how often you need to water. If you use plastic pots, you will need to water less often than if your plants are in unglazed clay pots.
Unglazed clay pots allow water to evaporate through the clay. If the pot is glazed, then treat it like a plastic pot. Glazed clay or ceramic pots are usually much more expensive than unglazed clay pots, or plastic pots.
Plants do better in pots with drainage holes. A thin layer of gravel, pieces of stockings, or pieces of broken pots should be used to prevent soil from washing through the holes.
Potting:
Saucer: Use a nice deep saucer for the pot. Make sure there is space left all around the base of the pot once you have placed it in the saucer.
Soil: Use good soil. Either buy special African violet soil or if you have ordinary potting soil, mix with peat moss and vermiculite (or perlite), as follows: 1/3 potting soil, 1/3 peat moss, 1/3 vermiculite or perlite.
Pebbles (at least a dozen per pot). A bunch of small pebbles off the beach are fine or buy some cute colored stones.
PEST AND DISEASE
Some pesticides damage plants so be certain the product you select is recommended for use on African violets. In many cases, the label provides a list of plants known to be sensitive to the pesticide, as well as those plants for which it is recommended. When possible, test-treat a few plants or a few leaves and look for signs of plant injury after 2 to 7 days before treating remaining plants.
Three of the most common ailments violets may get are (1)Blossom Thrips, (2) Mealy bugs, (3) Powdery Mildew. Below is listed the full set of aliments.
Root or Crown Rot: This is from a fungus Pythium ultimum, caused by over-watering. The crown and roots of these infected plants turn dark and soft, and the leaves usually wilt. Infected plants can be lifted easily from the soil. This disease is not a problem when plants are grown in a pasteurized soil mixture in a container that allows for proper drainage. Destroy badly diseased plants, and thoroughly clean and disinfect their containers before reusing them. Highly prized plants can sometimes be saved if the crown is not badly decayed. Remove the rotten portion of the crown well above the line of decay and reroot the plant in sterile medium.
Petiole Rot: This normally begins as an orange-brown or rust-colored lesion where the petiole touches the rim of pot or where it contacts the soil. This is aggravated by the accumulation of fertilizer salts on the rim of the porous pot or on the soil surface. An aluminum foil collar or ring on the rim of the pot and flushing the soil occasionally with heavy watering will prevent this problem.
Ring Spot or Chlorosis: The unsightly yellow or white ring and line patterns that occasionally appear on the leaves are thought to be caused by a sudden chilling of the leaves by cold water or by the sun shinning on wet leaves. This condition can be avoided by carefully watering the plants from below with water slightly warmer than air temperature.
Powdery mildew: This appears as a light gray, powdery substance on the stems and petioles. This shortens the life of blooms and makes the violet unthrifty. Mildew grows conditions where the violet is in a cool, moist area with still, stagnant air. The best cure is air circulation - a small fan moving the air in the room will keep it from developing.
Control through use of system fungicide:
- Karathane is a good control, as is dusting sulfur when a very small amount is blown lightly over the plants.
- Physan: Spray once or twice with a system fungicide (1/4 teaspoon. per pint of warm water), or mix 5 drops Physan 20 in 1 cup warm water and spray the entire plant both the affected and the unaffected areas. Phyton 27 is a new fungicide. It leaves no residue.
Root-knot Nematodes: African violets infested with root-knot nematodes are stunted and weakened. Galls form on the roots, and the crown and leaves become thickened and distorted. Blisterlike galls also develop on the leaves. Destroy all infested plants, sterilize their containers, and propagate new plants only from nematode-free plants.
Botrytis blight: The leaves of plants grown under greenhouse conditions may become infected by the fungus Botrytis cinerea. Botrytis blight first appears as small water-soaked lesions on the underside of the leaf. These lesions enlarge until much of the leaf turns brown to black. Affected plant parts and flowers become covered with gray mold. High humidity, poor air circulation, and low light intensity contribute to the development of this disease. Spores of the pathogen are spread by direct contact of leaves. Spacing the plants so that the leaves of adjacent plants will not touch reduces spreading to healthy plants.
Since infection by Botrytis often follows mite injury, controlling these pests aids in controlling disease. The application of a foliar fungicide may be needed to control severe outbreaks.
Cyclamen mites: Insects and mites occasionally damage the foliage and flowers of African violets. Cyclamen mites are extremely small insects, not visible without magnification. Cyclamen mites feed in the plant crown, on the growing tip of the plant, causing young leaves and new leaf growth to be stunted, twisted, contorted, curled, discolored, brittle, and look hairy. Corky layers develop over injury causing puckering, twisting and distortion of leaves in the center of the plant.
When infestations are heavy, leaf hairs become matted and flower buds fail to open.
Control:
- Cyclamen mites can be controlled by treating infested plants at weekly intervals for three weeks with dienochlor (Pentac 50WP) at a rate of 1 teaspoon per gallon of water, or
- with 2 or 3 applications of dicofol (Kelthane) as directed on the label. Adding a few drops of liquid detergent to the spray will increase coverage and provide better control.
Isolate infested plants and be careful while handling them so you do not accidentally transfer mites from one plant to another.
Red Spiders: These pests injure the plant by puncturing and sucking sap. In large numbers, they develop a web over leaves, flowers, etc. Plants appear stunted. Insects are small, reddish in color and visible to the naked eye. If you shake a leaf on a white piece of paper, they can be observed crawling.
Mealy bugs: These are small, soft-bodied insects about 1/8 inch in length that occur in white, cotton clusters on the surfaces of leaves, on leaf petioles, and near the bases of leaf stems and don't move. They injure plants by piercing and sucking plant juices, which causes stunting and distortion of the leaves. Mealy bugs also excrete a shiny, sticky substance called honeydew that is highly attractive to ants and also supports unsightly growths of a dark sooty mold. Heavy mealy bug infestations may cause leaves and plants to wither and die.
Control:
- When infestation are heavy or when many plants are involved, the best approach is to make 2 to 3 weekly applications of 57% Malathion at a rate of 2 teaspoons per gallon of water or 1/4 teaspoon per quart of warm water.
- Safer Insecticidal Soap (4 1/4 teaspoon per pint of warm water).
- Disulfoton (DiSyston), a systemic granular insecticide, will also provide satisfactory control if scratched into the soil and watered in.
- Mealy bugs can often be eliminated by spraying plants with a jet of lukewarm water or by removing them when a cotton swab dipped in alcohol, although I find this almost an useless method.
- Hanging a Vapona pest strip in the vicinity of plants may help prevent re-infestation.
Aphids: Stunted plants with curled or distorted leaves may be an indication of feeding by aphids. Both adult and nymphs are similar in appearance with soft, pear-shaped bodies, long legs, and antennae. Also called plant lice, they are usually green or black. Like mealy bugs, aphids excrete honeydew which gives leave surfaces a shiny appearance and supports the formation of sooty mold.
Control:
- These may require treatment with Malathion Carefully read the label and follow directions for applying pesticides or
- Aphids can be washed from infested African violets with a spray of lukewarm water, or
- treated with an insecticide such as 57% Malathion at a rate of 2 teaspoons per gallon of water plus a few drops of liquid detergent. Repeat this treatment after 7 to 10 days. When only a few plants are involved, consider using a premixed, commercial house plant spray that lists both aphids and African violets on the label.
Thrips: These are tiny, slender insects characterized by long, hair-fringed wings. They are fast moving insects and damage African violets by feeding on the leaves and blossom petals.
Typical leaf injury appears as irregular or streaked silvered areas dotted with small, black drops of excrement. Flower feeding causes distorted blooms, discoloration or streaking of petals, and shorter flower life.
Control: Thrips can be controlled following one of the following:
- Spray twice a week for several weeks directly into the blooms and on the foliage with either Safer Insecticidal Soap (4 1/4 teaspoons per pint of warm water ) or with Neem Oil (2 1/2 teaspoons per pint of warm water).
- Spray twice a week for several weeks directly into With 1 or 2 applications of premixed, commercial house plant spray containing Malathion or Orthene. Be sure that the product is specifically labeled for both thrips and African violets.
When only a few plants are involved, consider using a premixed, commercial house plant spray that lists both aphids and African violets on the label.
PROPAGATION
The usual method of propagation is by leaf cuttings during the spring. Cut off mature leaves with about an inch of their stalks. Firmly plant the stalks into sand, vermiculite, or in small container of water with most of the leaf blades exposed. If placed in sand or vermiculite, thoroughly water the sand. In greenhouses, the cuttings are usually covered with light muslin or glass to keep the air moist. In the window garden, a few cuttings can be covered with a glass jar or plastic. In the two to six months young plants start from the bases of the stalks. After these have been formed two or three small leaves, they are ready to be potted.
My mother just places each leaf through a small hole in a saran wrap covered shot glass or small vase. This unit is then placed on the window seal or under a florescent light. This always works.
Growing and propagating African violets can be done using small plastic pots but I have found small plastic Dixie cups work just as well. As long as I put a hole in the bottom of the cup to drain excess water, these work well to start my seeds.
I use shallow trays (normally 1 – 1 1/2 " deep) that have ridges. These can be found at any store that sells gardening supplies. I find those that are about 18 " long and 2-4" wide work well. I cover the plastic or paper cups with a sheet of plastic wrap to hold in the moisture until the seeds germinate and set on in the tray.
A flowering plant can be produced from a leaf cutting or a seen in about 10 months under good growing conditions.
The most trouble-free method of propagating violets is to make a greenhouse with two 8 x 12 inch clear plastic storage boxes. Fill the bottom of one box with 4 inches of potting soil. Moisten the soil and then stick overlapping violet leaves about 1/2 inch into the soil. Place the clear plastic bottom of the other storage box on top and tape the sides. Place the sealed box in an east or south window. Young violet plants will appear in 8 to 10 weeks and be ready for transplanting in three months.
When potting newly rooted cuttings, it is best to not add fertilizer. However, when dividing or shifting large plants to larger pots, you may want to use 1/4 to 1/3 teaspoon of a complete African violet fertilizer for each 5-inch pot volume of soil mixture. Thoroughly mix the fertilizer into the soil to prevent root injury. A slightly acid soil mixture (pH 6.0 to 6.5) will give the best results.
A saturated soil mix also leads to unthrifty top growth and root rot. A layer of coarse gravel at the bottom of the container will not improve drainage.